|
The configuration of Monitor Types is performed through policies. Policies enable you to deploy configurations on PATROL Agents and monitoring solutions, such as NetApp Storage Monitoring in an automated way. Policies are designed to define and configure monitoring criteria and apply them to selected PATROL Agents. The configuration criteria are automatically pushed to the PATROL Agents on which the policy is applied. When a monitoring policy is applied to a PATROL Agent, the device is automatically added to the list of monitored devices.
To create a monitoring policy
| 1. | Log on to the TrueSight console. |
| 2. | In the navigation pane, expand Configuration and select Infrastructure Policies. |
| 3. | In the Infrastructure Policies page, ensure that the Monitoring tab is selected and click Create Policy. |
| 4. | In the Create Monitoring Policy page, specify the monitoring policy properties: |
Step 1 - Define the General Properties
|
|
|
|
|
Name for the policy. The policy names must be unique. In an environment with tenants, the policy names must be unique for a single tenant. It is a mandatory field.
|
|
|
(Optional) A brief description about the policy.
|
|
|
Name of the user group that is associated with the PATROL Agents as defined in the Authorization Profile or in the PATROL Agent ACLs. The policy is applicable to these PATROL Agents.
|
|
|
Specify whether this policy is to be shared with the users across the associated user group or not. This property can be viewed in READ-ONLY mode by other users of the associated user group. Only the owner of the policy can modify this property.
|
|
|
Priority of the policy. Based on the precedence number that you configure, the configuration is applied to the PATROL Agents and the Infrastructure Management servers.
The precedence number ranges from 0 to 999. A lower number indicates a higher precedence. The default value is 900.
The configuration from a policy with a higher precedence overrides the configuration from a policy with a lower precedence. If two policies have the same precedence number, then the configuration from the latest created policy takes priority.
|
|
|
Indicates whether the policy is enabled or disabled. By default, the policy is enabled. If you disable a policy when you create it, the policy configurations are not applied to the PATROL Agents and the Infrastructure Management Servers. If you disable any existing policy, the policy configurations are removed from the PATROL Agents and the Infrastructure Management servers, where the policy was applied.
|
Step 2 - Select the PATROL Agents
Define conditions to select the PATROL Agents on which you want to apply the policy:
| 2. | Select an operator to create the condition. The available operators depend on the property that you select. |
| 3. | Specify a value for the selected property. |
| 4. | (Optional) To add more than one condition, click the  button, and perform the earlier steps. button, and perform the earlier steps. |
| 5. | (Optional) To group the conditions, use the parentheses and Boolean operators from their corresponding lists. |
The Add Monitor Types dialog box presents configuration fields for compatible BMC PATROL monitoring solutions that are located in the Central Monitoring Repository.
Step 3 - Select the NetApp Filers KM Monitor Type
| 1. | Click the Monitoring tab. |
| 2. | Click Add Monitoring Configuration. |
| 3. | In the Add Monitoring Configuration dialog box, configure the properties: |
| ▪ | From the Monitoring Solution menu, select NetApp Storage. |
| ▪ | From the Version menu, select the required version. |
| ▪ | The Monitor Profile is automatically selected. |
Step 4: Add a Monitoring Configuration
| 1. | In the NetApp Filer Configuration section, click Add to open the NetApp Filer settings panel. |
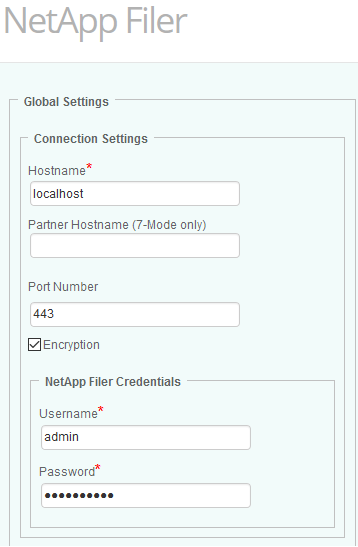
NetApp Filer Global Settings
| 2. | In the Global Settings section, identify the NetApp Filer you wish to monitor: |
| ▪ | Enter the Hostname or IP address of the NetApp Filer in C-Mode or the Hostname or IP address of the first controller in 7-Mode. |
| ▪ | (7-Mode only) Enter the Partner Hostname or IP address of the second controller of the NetApp Filer. |
| ▪ | Provide the port number used by the Data ONTAP Service. By default, the Data ONTAP Service uses port 443 with encryption or port 80 without encryption. |
| ▪ | Select the Encryption option to encrypt your connection data. |
| ▪ | Enter the Username and Password that will be used to connect to the NetApp Filer. |
| 3. | (Optional) - Customize the following settings: |
| 4. | Click OK to save your settings. |
Step 5: Configure other settings
| 1. | From the Add Monitoring Configuration panel, you can perform the following operation: |
To edit a monitoring policy
| 1. | Log on to the TrueSight console. |
| 2. | In the navigation pane, expand Configuration and select Infrastructure Policies. |
| 3. | In the Infrastructure Policies page, locate the monitoring policy you wish to modify, click its action button  and click Edit. and click Edit. |
| 4. | In the Edit Monitoring Policy page, locate the monitoring configuration you wish to modify and click its action button to access the monitoring options panel. |
| 5. | Customize the configuration. |
| 6. | Click Save to apply your changes to the selected PATROL Agent(s). |
|


